


Crafting is one of those things that actually pays off — in finished pieces that look good on your walls, in gifts that people genuinely keep, and in the quiet satisfaction of making something with your hands that wasn’t there before. The 10 fun DIY craft projects below were pulled from real Pinterest search data, so every single one of them has an audience actively looking for it right now. Some take an afternoon. A couple can be done in an hour. All of them use materials you can find on Amazon, and the results look far more expensive than what you actually spent.
Affiliate Disclosure: This post contains Amazon affiliate links. I may earn a commission if you make a purchase through these links, at no additional cost to you.
1. DIY Resin Tray
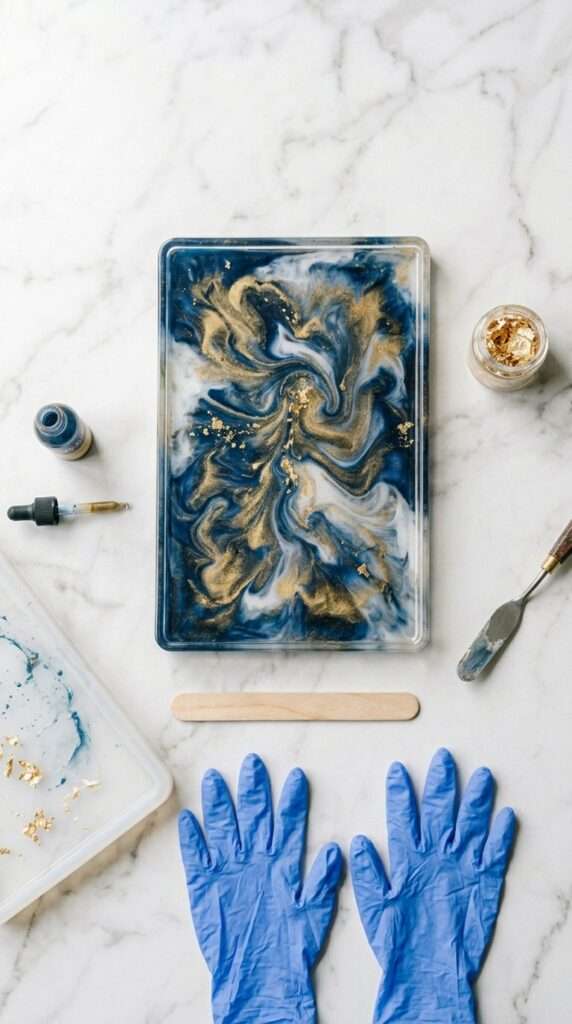
A DIY resin tray is one of those projects where the materials do most of the heavy lifting — swirl two or three alcohol ink colors into clear epoxy resin, pour it into a silicone mold, and 24 hours later you have something that genuinely looks like expensive marbled stone. The technique is forgiving: no two pours ever look the same, which means every result is its own design. Use the finished tray as a jewelry catchall, a candle display, or a catch-all on a bathroom vanity. A good beginner resin kit comes with everything needed for the first several pours, including the hardener ratios that make or break the final result.
🛒 Shop items for DIY Resin Tray
- Epoxy Resin Kit for Beginners
- Alcohol Ink Set for Resin
- Silicone Tray Molds for Resin
- Resin Mixing Cups and Stir Sticks
- Nitrile Gloves for Resin Crafts
2. DIY Pegboard Craft Room Organizer
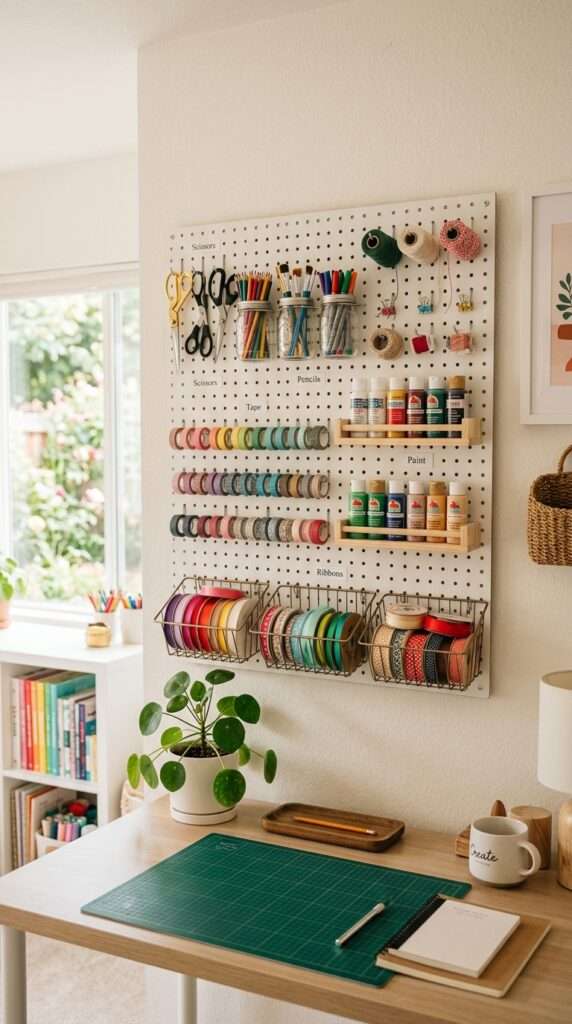
A DIY pegboard organizer is the single highest-impact upgrade you can make to a craft room — it gets your tools off the table, out of drawers, and into your actual eyeline where you’ll use them. Mount a large pegboard panel to a wall, paint it to match your space, and use a mix of pegboard hooks, small shelves, and storage bins to organize by project type: scissors and blades in one zone, adhesives in another, ribbon and twine in a third. The setup takes a couple of hours and costs a fraction of what a built-in cabinet system would run. The difference between a workspace that makes you want to sit down and create versus one that stresses you out before you’ve started is almost entirely organization.
🛒 Shop items for DIY Pegboard Craft Room Organizer
- Pegboard Wall Organizer Panel
- Pegboard Hooks and Accessories Set
- Pegboard Bins and Baskets
- Small Pegboard Shelf Brackets
- Rolling Craft Storage Cart
3. DIY Concrete Planter
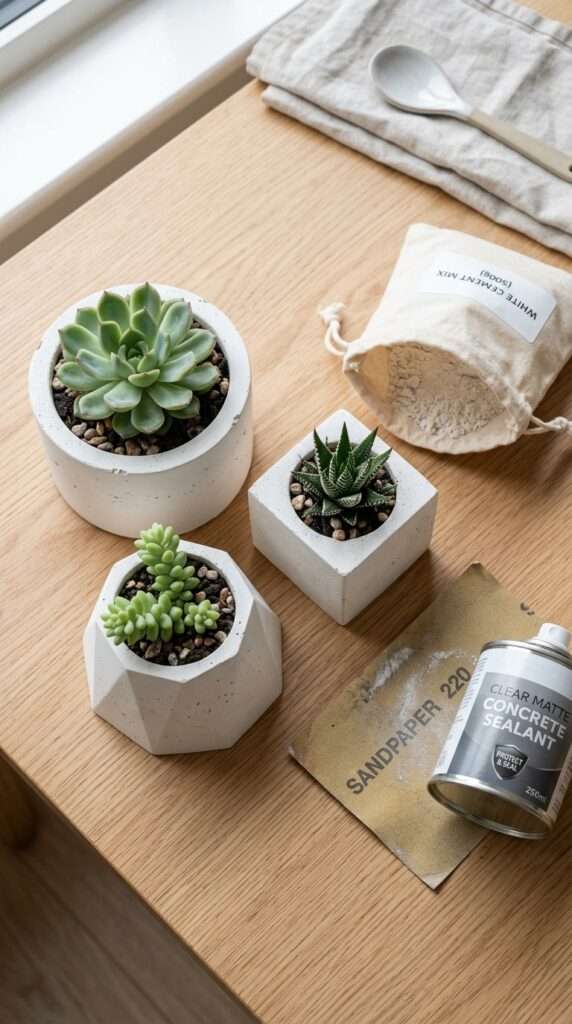
DIY concrete planters cost under $10 in materials and produce something that retails for $40 at a home decor store. The basic method involves mixing white cement with water, pouring it between two nested containers, letting it cure for 24–48 hours, then sanding and sealing the finished piece. Press leaf imprints or geometric texture stamps into the wet cement before it sets to add detail without any extra skill required. Seal with a clear concrete sealer and the planter holds up for both indoor succulents and outdoor herbs without crumbling or staining.
🛒 Shop items for DIY Concrete Planter
- White Cement Craft Mix
- Silicone Planter Molds for Concrete
- Concrete Sealer Spray
- Sandpaper Assortment Fine Grit
- Concrete Texture Stamp Set
4. DIY Paper Quilling Wall Art
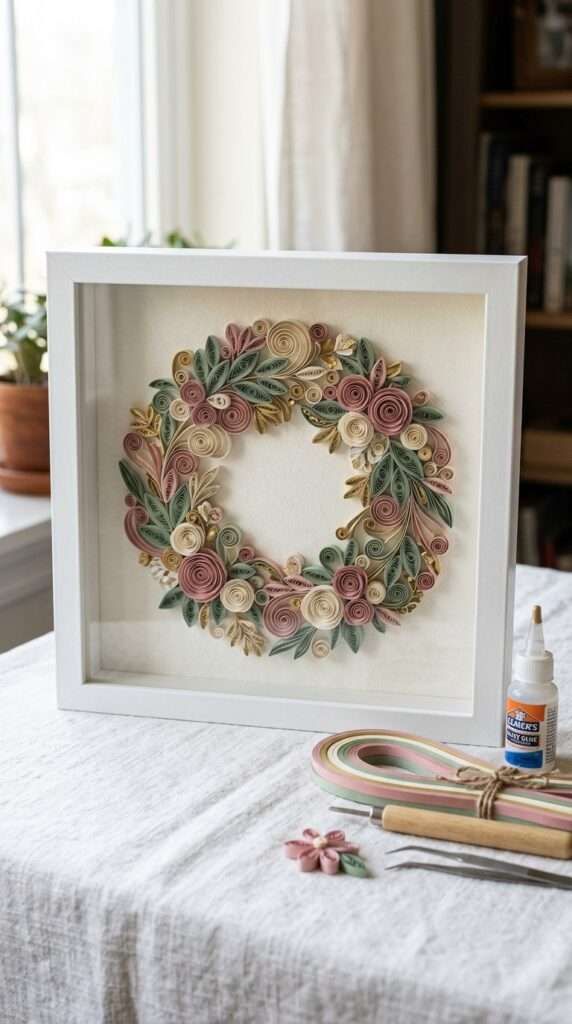
Paper quilling looks impossibly intricate until you realize it’s really just rolling and pinching strips of colored paper into shapes and gluing them into a frame. The finished result — a floral wreath, a geometric mandala, an abstract swirl — reads as gallery wall art, not a craft project. A paper quilling kit comes with pre-cut strips in multiple colors, a slotted quilling tool, and a guide to the basic shapes that form the building blocks of every design. Frame the finished piece behind glass and it’s the kind of thing guests stop to look at and ask about.
🛒 Shop items for DIY Paper Quilling Wall Art
- Paper Quilling Kit with Tools
- Quilling Paper Strips Assorted Colors
- Quilling Board and Pins
- Shadow Box Frame for Craft Display
- Fine Tip Craft Glue for Quilling
Affiliate Disclosure: This post contains Amazon affiliate links. I may earn a commission if you make a purchase through these links, at no additional cost to you.
5. DIY Beaded Bracelets

DIY beaded bracelets have evolved well past the friendship bracelet phase — the current look is all about layered seed bead stacks, polymer clay disc beads, and mixed metal charm bracelets that could pass for something from a boutique jewelry brand. The materials are inexpensive enough that experimenting doesn’t sting when a design doesn’t work out, and the per-bracelet cost usually runs under $2 once the supplies are in hand. Polymer clay opens up the option to make custom disc beads and charms in any color combination, which is where the more interesting results start happening. A finished stack of five or six bracelets in coordinating colors is also one of the best low-cost DIY gift options around.
🛒 Shop items for DIY Beaded Bracelets
- Seed Bead Set Assorted Colors
- Stretch Elastic Bracelet Cord
- Polymer Clay Set for Jewelry Making
- Bracelet Clasp and Findings Set
- Bead Tray Organizer
6. DIY Egg Carton Flower Wreath
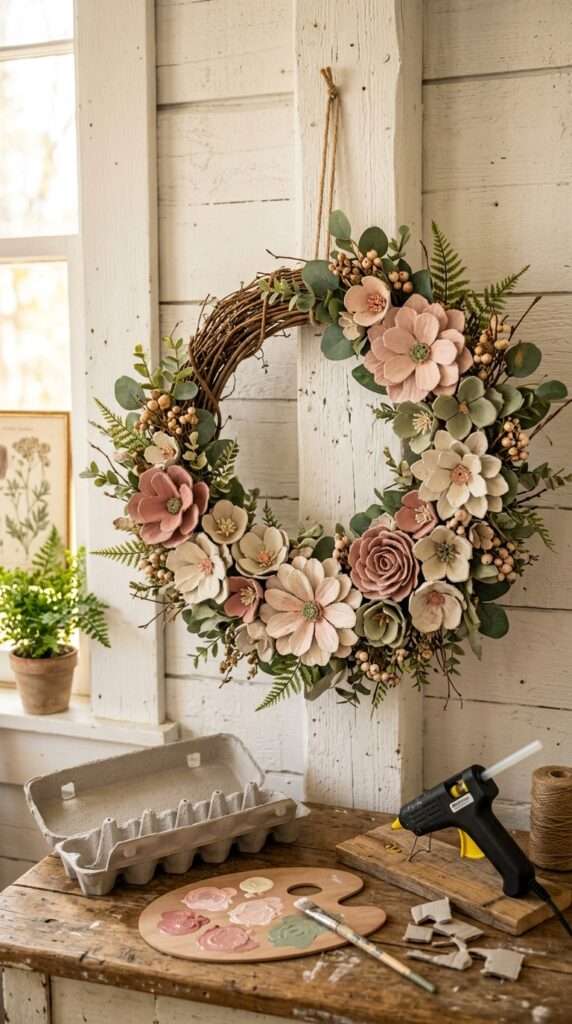
Turning cardboard egg cartons into a decorative flower wreath is one of the more satisfying upcycling projects because the raw material looks like trash and the finished product looks like something from an Etsy shop. Cut each cup section into petal shapes, curl the edges with a pencil, paint them with acrylic paint, and layer them into flowers using a hot glue gun. Arrange the flowers onto a foam wreath base with faux greenery tucked between, and the result is a wreath worth hanging on a front door or above a fireplace. The whole project takes an afternoon and costs next to nothing beyond supplies most crafters already have.
🛒 Shop items for DIY Egg Carton Flower Wreath
- Acrylic Paint Set Multi-Color
- Hot Glue Gun and Glue Sticks
- Foam Wreath Base
- Faux Greenery Leaves for Wreaths
- Small Detail Paint Brush Set
7. DIY Macramé Wall Hanging
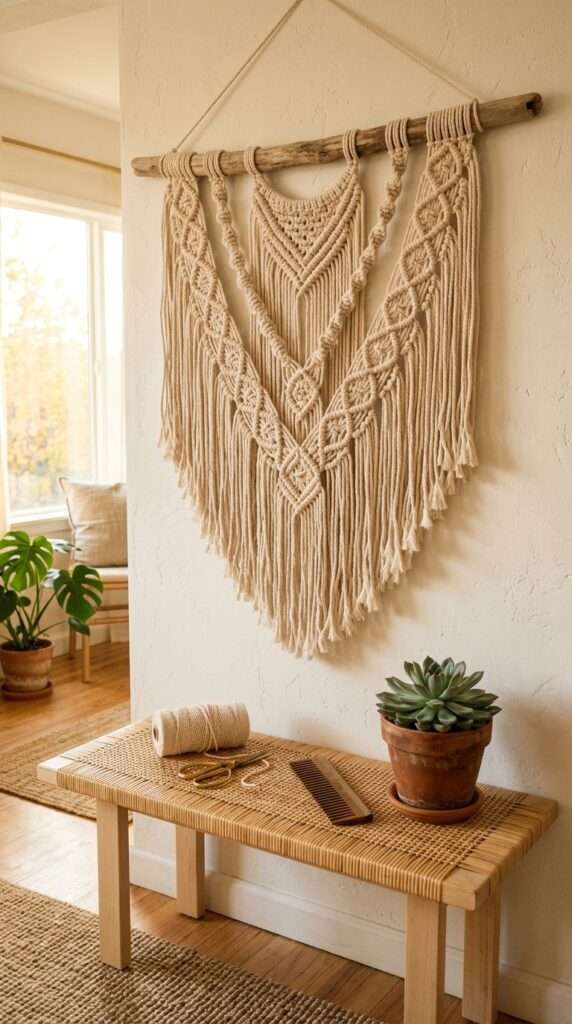
A DIY macramé wall hanging requires a wooden dowel, a spool of macramé cord, and about two hours to learn the four knots that make up 90% of all macramé patterns — square knot, half hitch, lark’s head, and gathering knot. Once the hands learn the rhythm it becomes genuinely meditative, and the finished piece gives any wall an immediate textured, bohemian look without a lot of hanging hardware. Natural cotton macramé cord in 3mm or 5mm thickness is the easiest to start with because it holds its shape, unravels cleanly when you make a mistake, and photographs well. Start with a simple fringe pattern and move into geometric designs once the basic knots feel automatic.
🛒 Shop items for DIY Macramé Wall Hanging
- Natural Cotton Macramé Cord 3mm
- Wooden Dowel Rods for Macramé
- Macramé Starter Kit for Beginners
- Steel Comb for Fringing Macramé
- Macramé Pattern Book
8. DIY Soy Wax Photo Candle
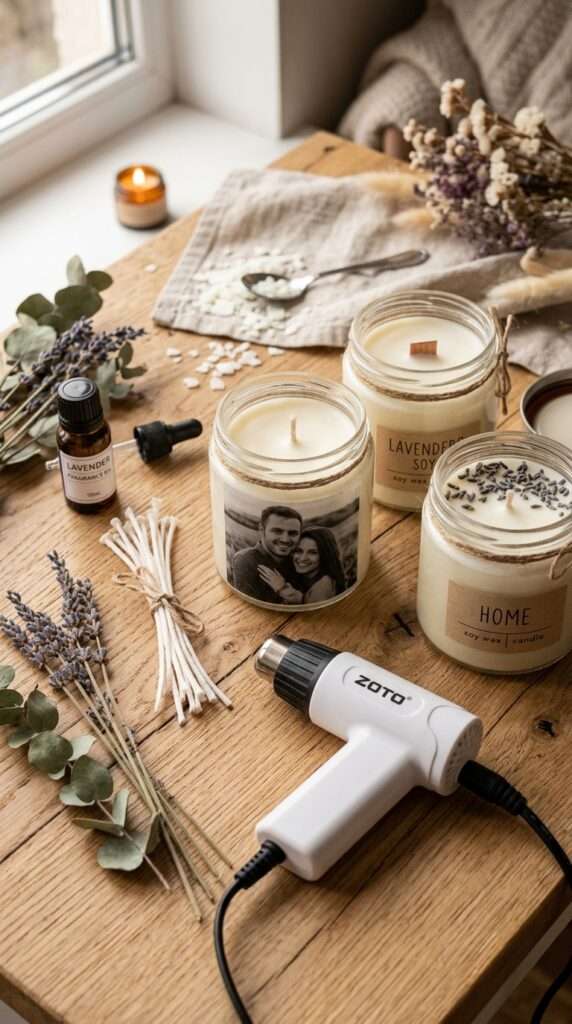
A DIY soy wax photo candle is consistently one of the most-searched gift ideas for good reason — it’s personal, it looks considered, and the recipient actually uses it rather than shelving it alongside other well-intentioned gifts. The photo transfer method involves wrapping a laser-printed image around the outside of a finished soy wax candle and using a heat gun to gently melt the outermost wax layer so the image bonds to the surface. Start with a soy wax candle-making kit to get the wax, wicks, and fragrance oils in one purchase, then add the photo element once the base candle has fully set. The whole project takes under two hours and lands as one of those gifts that makes someone genuinely pause.
🛒 Shop items for DIY Soy Wax Photo Candle
- Soy Wax Candle Making Kit
- Candle Fragrance Oil Set
- Candle Wicks with Sustainers
- Heat Gun for Crafts
- Glass Candle Jars
9. DIY Personalized Christmas Ornaments
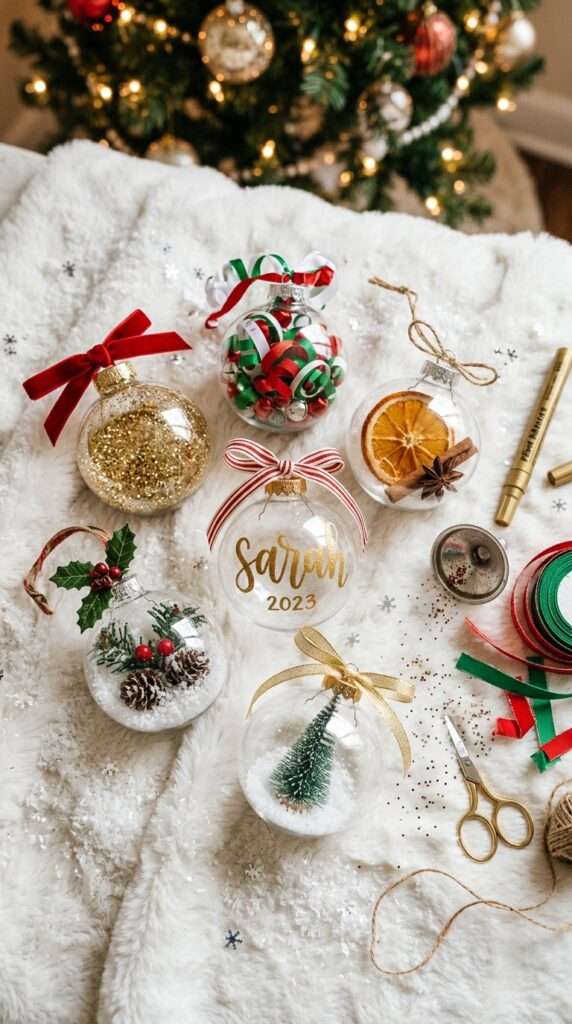
DIY Christmas ornaments are the handmade gift that actually gets kept — people pull them out every year, specifically, over the store-bought ones. The most popular approach right now is clear glass ball ornaments filled with custom elements: a curl of buffalo plaid ribbon, dried orange slices, a mini photo print, or glitter and metallic paint poured inside and swirled to coat the interior. A paint marker on the outside adds a name, date, or short message that turns a decorative piece into a keepsake. Buy ornament blanks in bulk and one afternoon produces personalized gifts for an entire family.
🛒 Shop items for DIY Personalized Christmas Ornaments
- Clear Glass Ball Ornament Blanks Bulk
- Paint Markers for Glass Ornaments
- Glitter Set for Ornament Crafts
- Metallic Craft Paint
- Mini Ribbon Assortment for Ornaments
10. DIY Popsicle Stick Geometric Shelf
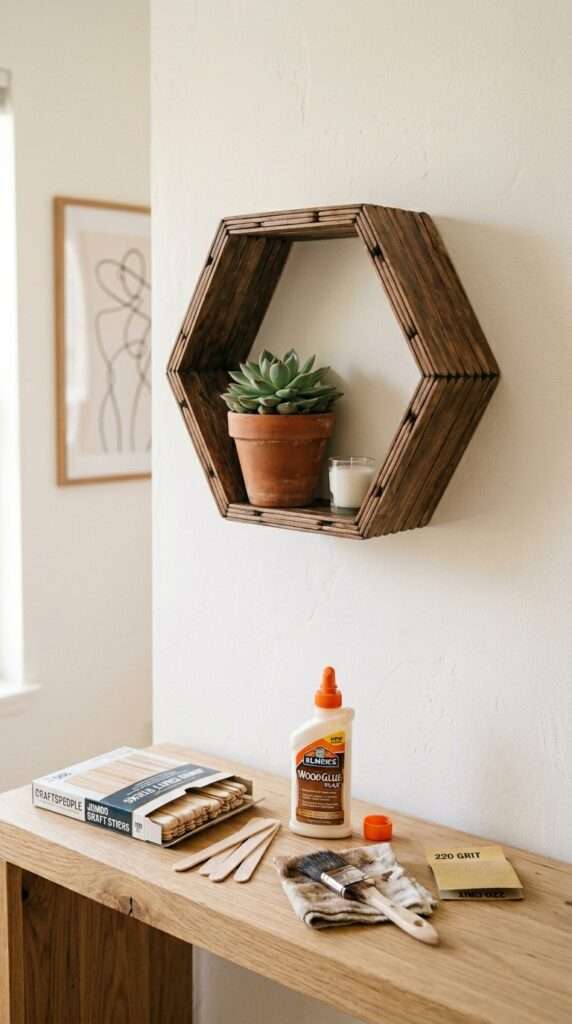
Popsicle stick crafts for adults have moved into genuinely architectural territory — with a pack of jumbo craft sticks, a bottle of wood glue, and a few hours of patience, a small hexagonal or diamond-shaped wall shelf comes together that’s sturdy enough to hold small succulents, candles, or figurines. The key to a clean finish is staining rather than painting: a coat of wood stain in walnut or oak gives the sticks a warm, natural tone that completely erases the kids’ craft association. Stack and glue the sticks in layers, let each layer dry fully before adding the next, sand any rough edges once the structure is solid, and mount with a command strip. The finished piece reads as intentional, modern wall decor — not a rainy-day activity.
🛒 Shop items for DIY Popsicle Stick Geometric Shelf
- Jumbo Craft Sticks Bulk Pack
- Wood Glue Strong Bond
- Wood Stain Walnut for Craft
- Fine Grit Sanding Sponge
- Command Picture Hanging Strips
Affiliate Disclosure: This post contains Amazon affiliate links. I may earn a commission if you make a purchase through these links, at no additional cost to you.